3.4 Reiter Einstellungen
Unter finden Sie alle Einstellungen, die für alle Module in cadwork gemeinsam sind. Über das linke Menü können Sie cadwork konfigurieren.
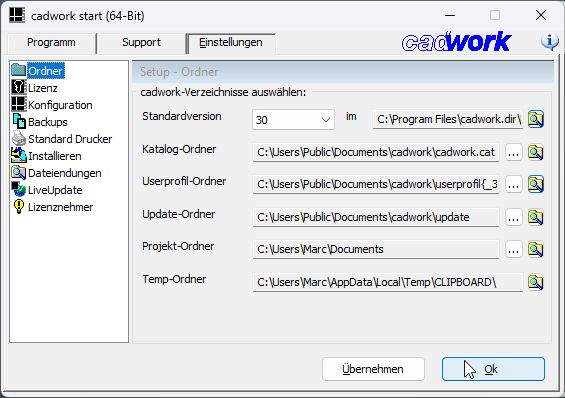
Verzeichnisse
Im Tab können Sie die festlegen (wenn mehrere Versionen installiert sind). Die ist die Version, mit der Dateien durch Doppelklick geöffnet werden. Neue Dateien werden ebenfalls mit dieser Version erstellt.
-
Sie können den Speicherort des (Benutzerkatalog, auch cadwork.cat genannt) sowie des ändern.
Falls eine Änderung notwendig ist, müssen zuerst alle cadwork-Dateien geschlossen werden. -
Neu seit Version 28:
Sie können jetzt direkt auf den zugreifen. Bisher war dies nur über cwsetup oder die Update-Konfiguration möglich. -
Der Projektordner ist der Ort, an dem neue Dateien erstellt werden, wenn sie über cadwork Start per Doppelklick geöffnet werden.
Wir empfehlen jedoch, neue Dateien über das Windows-Kontextmenü im Windows Explorer zu erstellen:
→ Neu
Mehr Details unter Eine neue cadwork-Datei starten. - Der wird vom Windows-System definiert und hier nur zur Information aufgeführt: Er kann hier nicht geändert werden.
Lizenz
Softwareschutz mit ID-Code
In diesem Abschnitt können Sie Ihre Lizenz überprüfen oder ändern.
Kundennummer
Die Kundennummer ist eine eindeutige Nummer, die jedem Kunden zugewiesen wird. Sie dient zur Identifikation des Kunden im cadwork-System und für das Lizenzmanagement. Die Kundendaten werden aus den bereits bei der Installation eingegebenen Daten angezeigt und können bei Bedarf durch Klicken auf die Schaltfläche rechts geändert werden.
Tipp:
In der Tabelle unten sehen Sie korrekte und falsche Kundennummern-Formate.
Es werden nur Kundennummern angezeigt, die mit 04 beginnen. Bitte entnehmen Sie Ihre genaue Kundennummer einem E-Mail-Verkehr oder einer Rechnung. Die Fehlergründe sollten entsprechend IHRER Kundennummer angepasst werden.
Achten Sie auf die Platzierung der Punkte in der Kundennummer, da diese wichtig für die Erkennung sind.
Beispiele für Kundennummern-Formate
| Welcher Benutzertyp? | Korrektes Kundennummern-Format | Falsches Kundennummern-Format | Grund für den Fehler |
|---|---|---|---|
| Kunden | 04.12345.0 |
|
|
| Schulen | 04.S123.0 |
|
|
| Lehrer | 04.p.12345 |
|
|
| Studenten |
|
|
|
Lizenzmethode
Die aktuell ausgewählte/erkannte Lizenzmethode wird angezeigt. In der Regel ist dies ein USB-Stick ().
Für eine Testlizenz wird eine oder eine verwendet. Die ist neu in V30 und nur für bestimmte Laptops verfügbar. Sie wird verwendet, wenn sich die bei einem BIOS- oder Windows®-Update ändert.
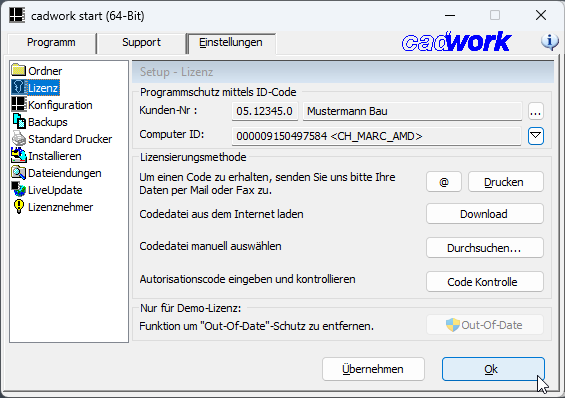
Wählen Sie eine Option, um Ihren Code einzugeben
Lizenzcode per E-Mail anfordern
Um eine Lizenz anzufordern, zum Beispiel eine Test- oder Studentenlizenz, basierend auf der Computer-ID, können Sie eine E-Mail mit der Lizenzanfrage senden, indem Sie auf das -Symbol klicken oder ein PDF drucken, indem Sie auf die Schaltfläche klicken. Es ist wichtig, zuvor die richtige Lizenzmethode (siehe oben) eingestellt und auf die Schaltfläche geklickt zu haben.
Alle registrierten Lizenzcodes aus dem Internet herunterladen
Wenn Sie Ihren Autorisierungscode erhalten haben, können Sie unter Laden Sie Ihre Codes aus dem Internet herunter einen neuen Code herunterladen, indem Sie auf die Schaltfläche klicken.
Die beiden Links unten führen Sie zu Hilfsvideos zum Herunterladen Ihrer Lizenz:
Bei Verwendung eines USB-Sticks (USB Memory):
Bei Verwendung einer Computer ID / Processor SN ID:
Warnung:
In manchen Fällen ist es notwendig, das Programm cadwork Start als Administrator zu öffnen, damit der Lizenzdownload korrekt funktioniert. Klicken Sie dazu mit der rechten Maustaste auf das -Symbol (auf dem Desktop oder im Startmenü) und wählen Sie .
Code manuell eingeben oder prüfen
Sie können mit der Schaltfläche sehen, was auf Ihrer Lizenz aktiv ist.
Eine erweiterte Funktion, die normalerweise nur bei Problemen benötigt und vom Support verwendet wird.
Nur für Demolizenz
Tool zum Entfernen des "Out-Of-Date"-Schutzes:
Diese Option wird ausschließlich von unserem Support in Ausnahmefällen verwendet.
Cadwork-Konfiguration
In diesem Dialog können Sie allgemeine Einstellungen wie die , den , die und die festlegen, die in cadwork verwendet werden.
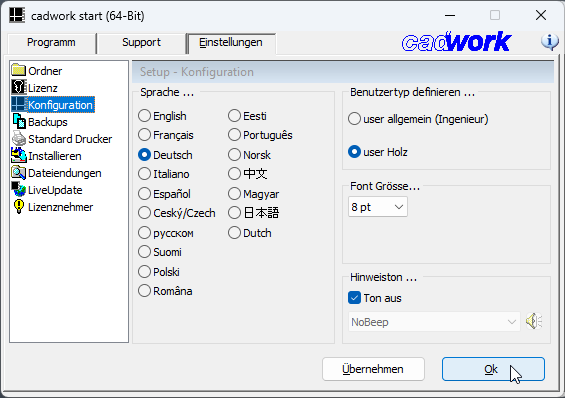
Sprache auswählen
Hier können Sie die Sprache jederzeit ändern. Die hier gewählte Sprache, ist die Sprache der cadwork-Benutzeroberfläche sowohl für die Installation als auch für die Nutzung.
Achtung:
Bitte beachten Sie, dass beim Ändern der Sprache und anschließendem Update andere Katalogdateien heruntergeladen und installiert werden können.
Benutzertyp festlegen
Als Kunde im Holz-/Stahlbau oder als Schreiner/Tischler sollte hier immer der ausgewählt werden. Als Ingenieur im Bereich Tiefbau oder Straßenbau wählen Sie die Option , die nur für den Schweizer SIA-Standard entwickelt wurde.
Im Zweifelsfall wenden Sie sich bitte an Ihren technischen Support.
Schriftgröße
Die Schriftgröße des Menüs kann hier eingestellt werden. Ändern Sie dies nur, wenn Sie Probleme mit bestimmten Bildschirmgrößen oder Auflösungen haben.
Signalton für cadwork-Warnungen auswählen
Sie können jeden beliebigen Warnton einstellen, der beispielsweise bei falschen Klicks abgespielt wird. Wenn Sie die Option aktivieren, ist cadwork stummgeschaltet.
Backups
In diesem Dialog können Sie zentral steuern, wie viele Sicherungsdateien *.3db (oder *2db, *.bak, etc.) beim Speichern behalten werden und wo sie abgelegt werden.
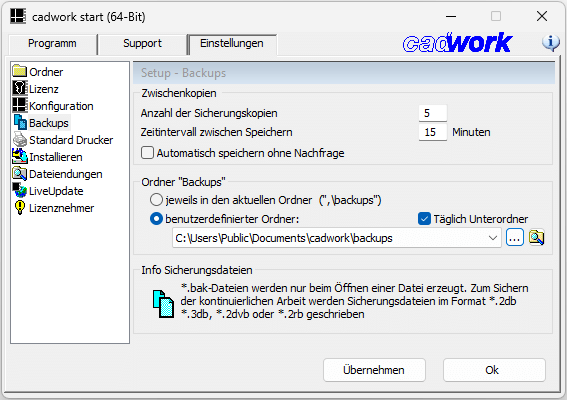
Sicherheitskopien
Anzahl der Kopien (*.2db;*.3db;*.2drb; *.2dvb)
Hier wird die Anzahl der Sicherungsdateien (*.*db) zusätzlich zur Originaldatei festgelegt. Die *.*db-Dateien erhalten eine fortlaufende Nummer. Der Standardwert ist 3, das heißt, es werden 3 Sicherungsdateien erstellt. Die älteste Datei wird überschrieben, wenn die festgelegte Anzahl erreicht ist.
Intervallzeit zwischen Dateispeicherungen
Nach der hier eingestellten Anzahl an Minuten aktiver Arbeit wird die Datei in einer cadwork-Datei gespeichert. Mit der Option können Sie steuern, ob Sie den Sicherungsvorgang noch bestätigen oder ablehnen müssen oder ob die Sicherung automatisch ohne Eingriff erfolgt. Damit diese Option funktioniert, müssen alle Menüs verlassen sein.
Im obigen Beispiel fragt cadwork alle 15 Minuten, ob Sie speichern möchten. Es werden maximal 3 Sicherungskopien aufbewahrt, sodass Sie Daten bis zu 3x 15 Minuten zurück wiederherstellen können, wobei die aktuellste *.*db-Datei dem Stand der letzten Originalspeicherung entspricht.
Sicherungsordner
Sie können hier festlegen, ob alle Sicherungen am gleichen Ort wie die Original-cadwork-Datei (im aktuellen Ordner in einem backups-Unterordner) oder in einem vom Benutzer definierten Ordner, zum Beispiel im Netzwerk, gespeichert werden sollen.Hinweis:
Wir empfehlen einen zu wählen, der sich auf einem anderen physischen Medium als die Originaldatei befindet, um Datenverlust bei Hardware-/Festplattenausfall zu vermeiden.
Täglicher Unterordner
Diese Option legt die Sicherungen eines Projekts in einem datierten Unterordner ab. Diese Unterordner werden nicht automatisch gelöscht: Sie erhalten so ein datiertes Archiv der verschiedenen Bearbeitungsstände.
Warnung:
Wenn Sie die Option wählen, ist es zwingend erforderlich, für jede Projektdatei einen anderen Dateinamen zu vergeben. Andernfalls überschreibt Projekt B die Sicherungen von Projekt A.
Standarddrucker
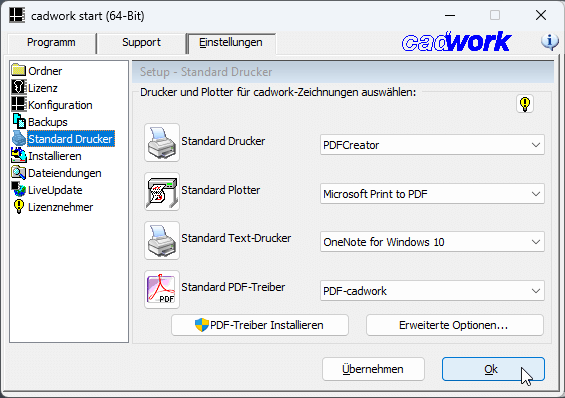
Die Standarddrucker können hier ausgewählt werden. Dies sind die Drucker, die in 2D vorausgewählt sind.
Hinweis:
Diese Einstellung entspricht nicht der Definition eines Standarddruckers in Microsoft Windows und hat auch keinen Einfluss auf die Funktion → in cadwork.
(Installation / Neuinstallation des PDF-cadwork-Druckers) und sollten nur bei Druckproblemen in Absprache mit unserem Support verwendet werden.
Installation
Dieses Menü enthält bestimmte Funktionen, die nur nach Rücksprache mit unserem Support-Team ausgeführt werden sollten. Das Setzen dieser Option kann Cadwork unbrauchbar machen.
Bei einigen Kundennummern (z. B. 04.*****.*) wurde dieser Menüpunkt ausgeblendet. Um ihn sichtbar zu machen, drücken Sie im weißen Bereich des linken Menüs ->+Optionen.
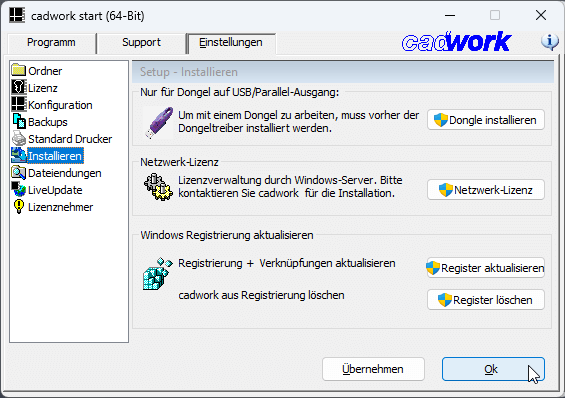
Dongle installieren
Diese Art von Lizenz wird fast nicht mehr verwendet: Die Option ist in der Regel nicht notwendig.
Netzwerklizenz
Wenn Sie eine Netzwerklizenz erworben haben, kann sie hier installiert und verwaltet werden. Die Installation ist passwortgeschützt und kann mit unserem Support durchgeführt werden.
Registrierung aktualisieren / entfernen
In manchen Fällen kann es notwendig sein, cadwork-Einträge in der Windows-Registrierung zu löschen oder zu aktualisieren. Auch dies sollte nur nach Rücksprache mit unserem Support-Team erfolgen.
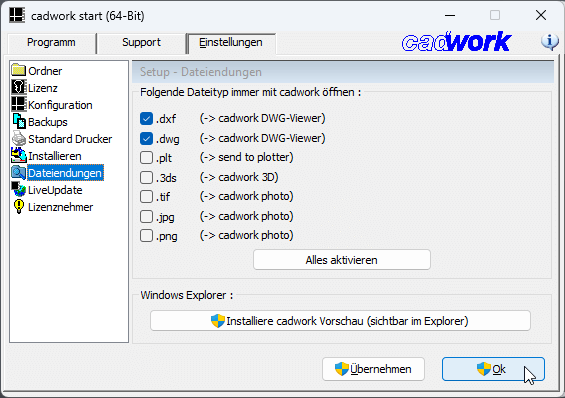
Dateiendung *.ext verknüpfen
Hier können Sie, wenn gewünscht, Nicht-cadwork-Dateien, die cadwork öffnen/importieren kann, mit cadwork verknüpfen, sodass sie beispielsweise per Doppelklick mit dem jeweiligen cadwork-Modul geöffnet werden.
Standardmäßig sollten Sie Dateiverknüpfungen nur für DXF/DWG-Dateien aktivieren. Für andere Dateitypen sind in Windows meist bereits andere, spezialisierte Standardprogramme installiert.
Live-Update
Im Live Update-Menü können Sie Cadwork aktualisieren. Das bereits von der Installation bekannte cwsetup wird gestartet, um Updates auszuführen oder zu konfigurieren.
Achtung:
Alle Optionen erfordern Administratorrechte, da Einträge in der Windows-Registrierung geändert werden müssen.
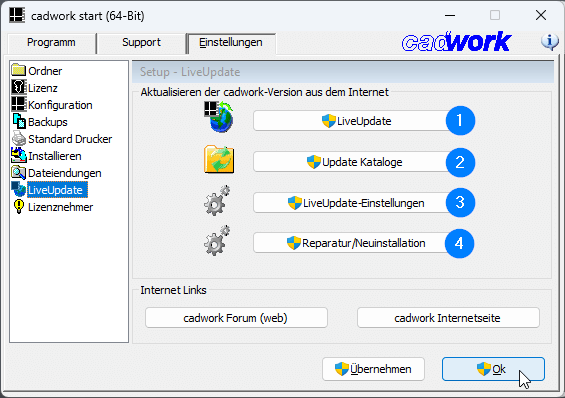
Programm-Update
Das Update wird gestartet. cwsetup prüft auf neuere Versionen und installiert diese. Je nach Einstellung kann dies von den cadwork-Internetservern oder nur aus einem im eigenen Netzwerk verfügbaren Update-Ordner (Offline-Installation) erfolgen. Auch die Kataloge und das Benutzerprofil werden bei Bedarf in diesem Schritt aktualisiert. Es ist nicht nötig, auf Katalog aktualisieren zu klicken.
Katalog-Update
Auch hier wird das cwsetup gestartet, aber es wird nur geprüft, ob neue Kataloge oder Benutzerprofile vorhanden sind, die dann ggf. installiert werden.
Aktualisierte Konfiguration
In diesem Bereich kann die Konfiguration für die Update-Option (siehe oben) geändert werden. Auch hier öffnet sich das cwsetup-Programm.
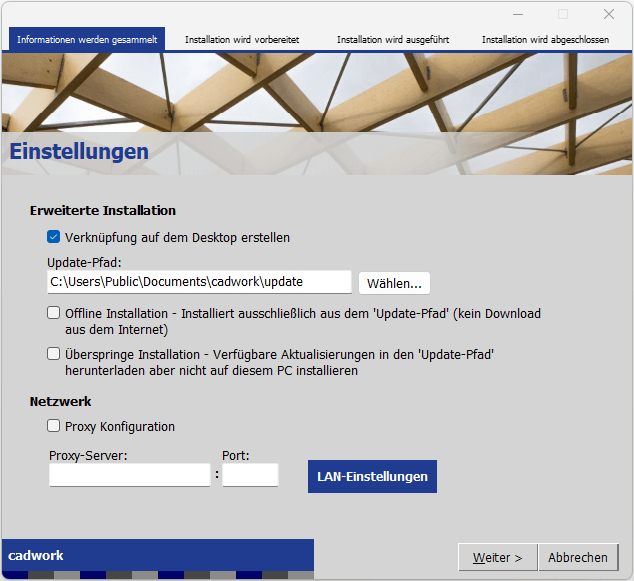
Einstellungen
Auf der ersten Seite der Einstellungen kann der Update-Pfad wie im Kapitel Verzeichnis beschrieben geändert werden.
Zusätzlich kann die Offline-Installation aktiviert/deaktiviert oder einfach Download ohne Installation der neuesten Module aus dem Internet aktiviert werden (was die Offline-Installation ausschließt).
Wenn Ihr Unternehmen einen Proxy-Server verwendet, kann dieser hier ebenfalls eingetragen werden, damit das Herunterladen der Daten während des Updates reibungslos funktioniert.
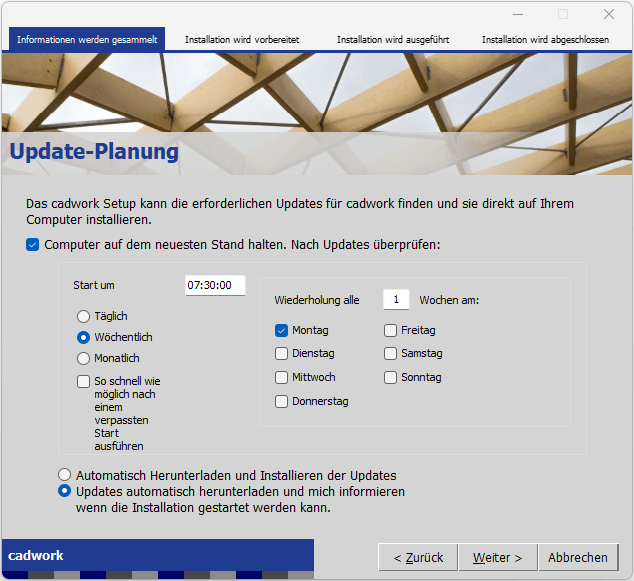
Automatische Update-Planung
Die zweite Seite Automatischer Update-Zeitplan bietet die Möglichkeit, einen Update-Zeitplan mit dem Windows-Taskplaner zu konfigurieren. Hier können Sie steuern, wann und wie oft das Update durchgeführt werden soll.
Es ist außerdem möglich zu entscheiden, ob Updates automatisch heruntergeladen und installiert oder nur heruntergeladen werden sollen.
Im zweiten Fall können Sie die Installation nach dem Herunterladen manuell starten.
Warnung:
Wenn Benutzer keine Administratoren auf ihrem Computer sind, ist die Option Automatisch Updates herunterladen und installieren zwingend erforderlich. Die zweite Option würde eine Benachrichtigung an das Administratorkonto senden, das jedoch nicht angemeldet ist. Daher wird das Update niemals abgeschlossen.
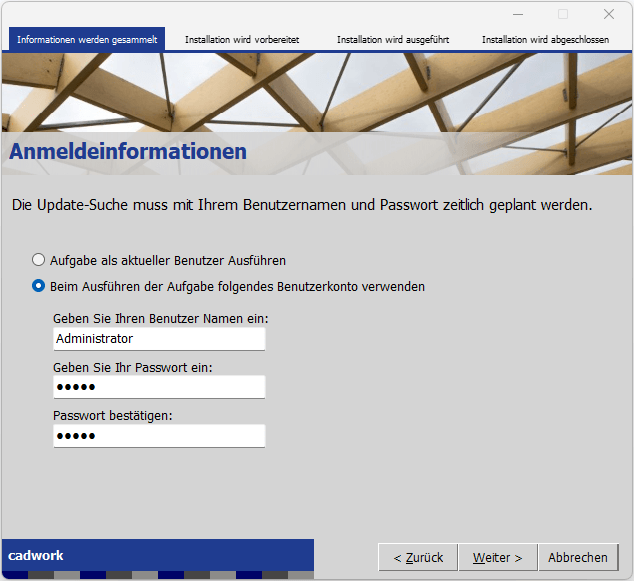
Administratorrechte
Die dritte Seite erscheint nur, wenn Sie auf Seite 2 ein automatisches Update geplant haben, da für die Ausführung der auf diese Weise erstellten Aufgabe ein dafür autorisierter Benutzer im Windows-Taskplaner eingetragen werden muss.
Wenn der angemeldete Benutzer diese Rechte hat, klicken Sie auf Aufgabe mit aktuellem Benutzerkonto ausführen. Andernfalls geben Sie bitte einen Benutzer mit den entsprechenden Administratorrechten ein. Dieser Benutzer wird nur zum Ausführen dieser Windows-Aufgabe verwendet.
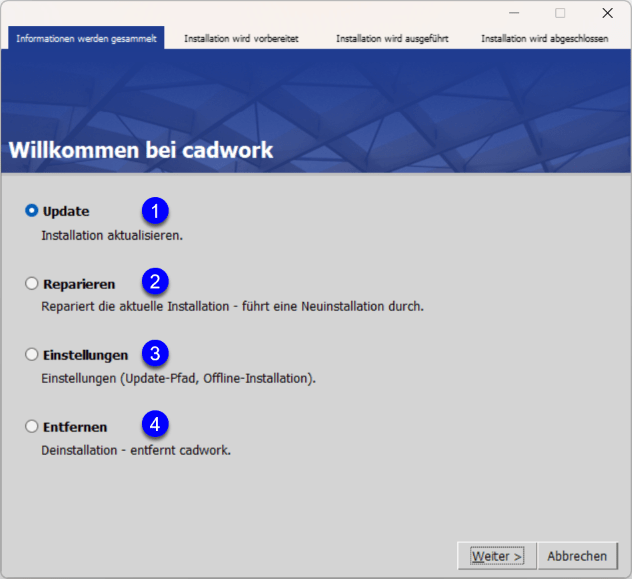
Reparatur / Neuinstallation
Mit der Schaltfläche kann das Programm cwsetup gestartet werden, um eine der folgenden Optionen auszuwählen:
-
1 Update :
Aktualisiert cadwork wie zuvor beschrieben (Programm-Update). -
2 Reparieren :
Repariert die cadwork-Installation. Dies kann erforderlich sein, wenn Dateien fehlen oder beschädigt sind. Ein Beispiel ist die Zerstörung einer Datei durch ein Antivirenprogramm oder wenn nicht genügend Speicherplatz auf der Festplatte C:\ vorhanden war. -
3 Einstellungen :
Ermöglicht die Einstellungen für das automatische Update wie zuvor beschrieben (Update-Konfiguration). -
4 Entfernen :
Mit dieser Option kann entweder cadwork vollständig deinstalliert oder ältere Versionen entfernt werden. Mit der Option vorherige Version entfernen, können Sie die zu deinstallierenden Versionen sowie die zugehörigen Userprofile auswählen.